

The Dutch Door is a very cool concept for your Bullet Journal!
It is such a great concept to incorporate Dutch Doors in your Bullet Journal!
What does this have to do with Holland (Dutch) you ask? I had the same question for a long time. I was surprised as to how the Dutch Door actually got its name when we talked about it during a workshop.
Actually, in the Netherlands you can often open only one half of a door, while the other half is still locked. That’s exactly what the Dutch Door does in the Bullet Journal!
A portion of the page is cut off so that some pages are partially visible. It may sound odd at first, but this can be very helpful in some situations!
Let me show you why Dutch doors are useful, how to handle them best, and which options are available.


Why can a Dutch Door be useful?
For weekly overviews, the Dutch Door gets a lot of attention! An added benefit: You can add much more stuff by using a Dutch Door!
Having more space for your planning and everything else makes sense when you have lots of things to keep track of in a week.
Because there is only so much space on a double page spread. With a Dutch Door, you can expand this space without constantly flipping back and forth!
That’s especially true when it comes to weekly overviews, but it doesn’t stop there. Moreover, you can expand your monthly overview using this trick. Or use it for individual projects that require a lot of flipping back and forth.


How do I create a Dutch Door?
It is quite simple to understand and implement a Dutch Door into a Bullet Journal. One thing is especially important:
Before you begin cutting, I suggest you first visualize the exact layout of your pages.
That way, you know exactly where to cut and how many pages to use. Different variants result in different looks.
You may think this is insignificant at first, but things can go bad very quickly, especially when cutting, if you don’t have a precise plan.
The Dutch Door can be drawn with a pencil or by visualizing in your head what the pages should look like. You should avoid making the lines too tight in this case so you can easily erase them later.
When you’ve decided what you want to write about and planned your layout, you can go ahead and cut the pages. It’s kind of like creating a mini booklet within the journal. We’ve finished the Dutch Door!

What can I use a Dutch Door for?
You can use the Dutch Door in many ways. Let me show you some examples.
Weekly overview
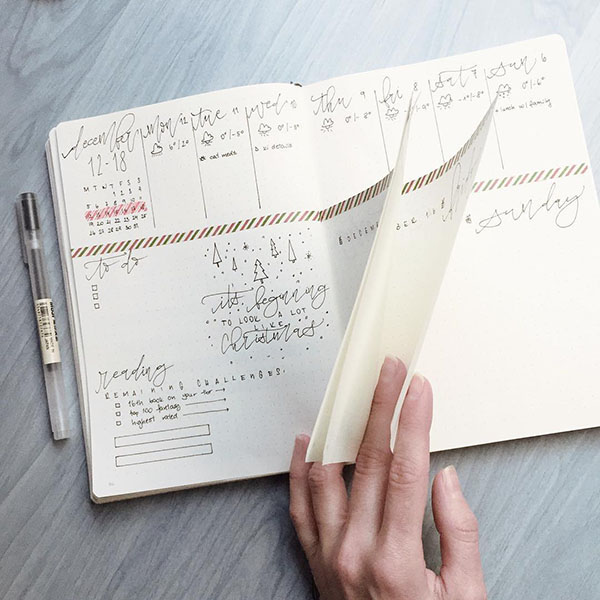
It is commonly used in the week overview. You can, for example, put each day of the week on top of a double page. The Dutch Doors created by cutting out the upper half of multiple pages then shows you each day. Use it then as a daily overview or as a diary, if you don’t need to plan so much.
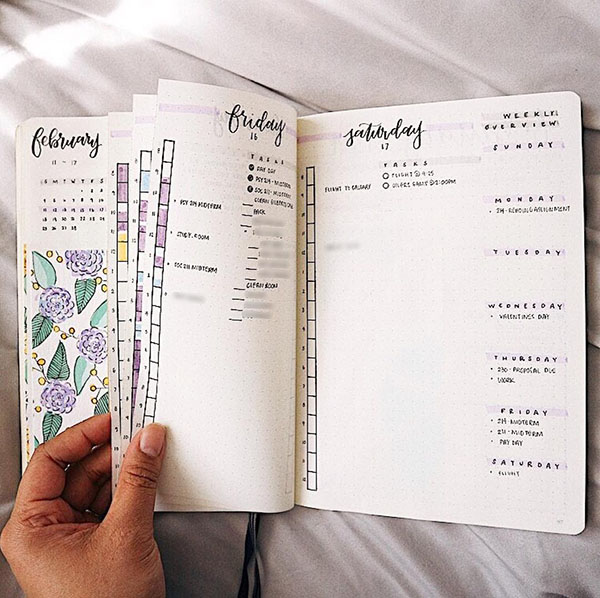
However, the Dutch Door can also be placed in another way, for example by cutting the sides and the bottom. The part of this variant that I find especially useful are the small tabs running along the edge of the Dutch Door. These help you to always arrive at the desired day directly and quickly.
The Dutch Door in these two examples looks like a mini booklet actually consisting of several pages. Of course, you can also limit the “door” to one page.
You can do this by slicing the page lengthwise. You can create a weekly To Do list, and possibly a meal plan, on the Dutch Door. The days of the week are represented on the page before and after.
It’s nice to have the freedom to manage each day while still keeping an overview of everything else that’s important!


Monthly overview
The weekly overview is probably the most popular but is certainly not the only option for using a Dutch Door. Use the concept wherever double pages are not sufficient but you still need to be able to see everything at a glance.
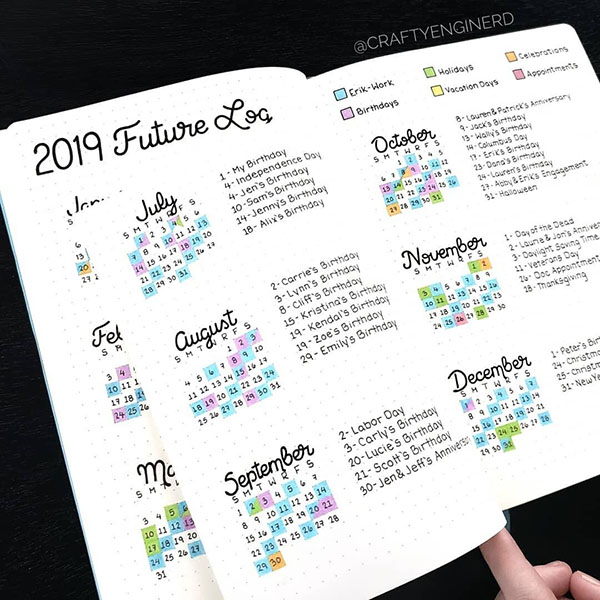
Of course, this is also applicable to the monthly overview as well. When there is limited space left in the month, but you still want to schedule appointments, etc., I find this useful. Trackers can also be added to Dutch Doors.

Conclusion

So now you have only seen a little of the possibilities and wonders that a Dutch Door creates! The concept, however, is not for everyone.
For beginners, it can be a lengthy process. By spending more time on it, you can achieve great results and make it easier to organize your life.
Personally, it would be a lot of effort for me to do it every week. It is quite fast and easy for me to finish my simple weekly overview. On the pages that follow, I make the individual daily overviews.
However, it is also great if you have everything together in a single place and don’t have to keep flipping.